When choosing colours, ensure that comparisons are undertaken in daylight. It is always advisable to compare colours with a painted boat as it is difficult to appreciate the colour in large areas. Our printed colour charts have accurate colour rendition but the enamel will appear to be lighter when applied to large areas, especially when adjoining complementary colours.
Where possible, ensure that you have the same batch number for the finish coats.
CONDITIONS
 Weather conditions play an important part when painting outside. Avoid if possible painting in direct sunlight or when the boat is obviously warm to the touch. The ideal temperature for painting is between 12oC and 20oC. Higher temperatures could result in poor flow, rapid drying and loss of gloss. Windy conditions will lead to dirt pick-up and faster drying. Do not apply in damp conditions and aim at finishing painting by mid-afternoon, as overnight condensation may affect the finish.
Drying times will vary considerably depending on conditions, but at 20oC in still air, light touch-dry for both undercoats and topcoats will be 1 to 3 hours, and through-drying will be 12 to 24 hours. If possible, longer drying times should be allowed before overcoating as this will make rubbing down easier. Where low temperatures are experienced and there is little air movement, drying times can be as much as doubled, so take this into account when judging when to apply the next coat.
A dust-free environment is essential to obtain a really good gloss finish. The removal of dust prior to painting is essential, and dust and debris must be removed between the sanding of each coat and the application of the next.
Rylard Plus Enamel has a high pigment level and therefore thorough stirring is necessary. Best results are achieved with a wide flat-ended blade or a piece of clean, flat-ended wood. Screwdrivers are not efficient for stirring! It is advisable not to wear loose or woollen clothing when painting as this can contaminate the freshly painted surfaces.
PREPARATION OF SURFACE
") BARE STEEL
BARE STEEL
Preparation: For best results, steel should be blast cleaned. This is not always possible, so alternatively mechanical cleaning by sanding and wire brushing can be undertaken to remove any rust.
Cleaning: The surface should then be thoroughly degreased using a water based or water dispersible degreaser, which must then be thoroughly washed off. Solvent cleaning is only efficient if clean wiping cloths are frequently replaced, otherwise the solvent just spreads the grease or oil around without removing it. Any remnants of grease or oil will affect paint adhesion and can cause slow drying and tackiness of the paint. Do not use diesel, paraffin or turps substitute for cleaning as they promote rust – white spirit is preferred.
Priming: The hull above the water line should then be coated with 2 coats of Rylard Zinc Phosphate Primer. If it is to be left outside for any length of time before applying finishing coats, 2 coats of Rylard Holding Coat are essential to prevent rust spotting.
") PREVIOUSLY PAINTED SURFACES
PREVIOUSLY PAINTED SURFACES
Rusted areas should be abraded down to clean steel and existing paint edges feathered to prevent ridging showing through. All clean metal areas should be patch-primed with 2 coats of Rylard Zinc Phosphate Primer.
Should rusting be extensive, consider having the boat blast cleaned and professionally repainted for long-term protection.
Where there have been feature lines, names, etc., ensure that these are completely removed to prevent shadowing-through.
If there is general unevenness and poor feathering, several coats of Rylard Primer/Filler should be used, abrading between coats to give an even surface. Rylard Primer/Filler can be used directly onto small patch areas.
Rub down the surface overall to an even matt finish using 320 grit wet and dry paper. If a colour change is to be undertaken, the relevant undercoat colour should be used.
PAINT APPLICATION
 Apply the paint using a good quality 2½” to 3” brush. Gloss rollers and pads can also be used. To ensure even application, apply by crossing brush strokes before laying-off. On boat sides, always lay-off with vertical strokes. With large areas such as cabin tops, best results can be obtained by two people applying to prevent loss of wet edge – one person applying, the other laying-off. When brushing, it is recommended that the brush is held at 45 degrees to minimise brush marking. Where masking tape is being used, it is recommended that this is removed before the paint has reached a light touch-dry state, as this will ensure a smoother edge.
Clean brushes regularly (about every 20 minutes), to prevent thick build-up of paint in the brush. Stir the paint regularly during application.
Except for the primer, rub down with 320 or 360 grit wet and dry paper between coats, to ensure a completely smooth, even finish. When using wet and dry paper, always use it wet, and occasionally apply domestic soap to the paper, as this will prevent blocking and aid abrading. (‘Blocking’ is build-up of paint debris on the paper, which may cause scratching of the paint film).
 Wipe over thoroughly after abrading, as dust and debris will affect the final appearance. The smoothness of the finish is ultimately dependent on the preparation, especially for Undercoats and Primer/Filler. Where coarse profile steel has been used, or where underlying imperfections in the surface exist, extra coats of Primer/Filler and Undercoats should be used.
Under normal circumstances thinning of the paint is not necessary, but where application is undertaken at low temperatures, or previously used paint has bodied in the can due to evaporation, small quantities of recommended thinners can be used.
SPRAY APPLICATION
Rylard primers, undercoats and topcoats can be applied by air assisted or standard airless spray. Thinning may be necessary dependent on the spray equipment used, please consult the relevant Product Data Sheet.
TRADITIONAL and POLYURETHANE VARNISHES
 NEW WOOD
Bare new wood should be sanded using either sandpaper or wet & dry paper, finishing with a 180 grit paper prior to applying the varnish. Ensure that all sanding dust is removed by either brushing or vacuuming before applying any varnish coats. The use of a tack cloth to remove any residual dust may also be used.
It is essential that any new oily wood, such as teak, is degreased using white spirit or cellulose thinners in order to improve penetration and adhesion. However, it should be noted that Polyurethane Varnish is NOT recommended for use on oily woods such as teak. The first coat of varnish should be thinned – 1 part varnish to 1 part of white spirit – and thoroughly stirred. Brush this coat well into the pores of the wood to ensure full sealing. After drying, sand smooth to remove the timber ‘nibs’ using a 320 or 360 grit wet & dry paper.
EXISTING VARNISHED SURFACES
If the existing varnished surface is in poor condition and is showing flaking or other imperfections, it is recommended that it is removed back to bare wood (using either a proprietary paint stripper or sanding) and the timber treated as for New Wood. If the existing varnish is in sound condition, rub down with a 320 or 360 grit wet and dry paper and clean with white spirit.
To obtain a good depth of gloss on both new wood and existing varnished surfaces, a multiple-coat treatment is recommended, with a minimum of 3 coats, with light rubbing down between coats using either a 320 or 360 grit wet and dry paper. Note: Rylard eggshell varnishes are not suitable for exterior surfaces.
SLIP RESISTANT DECK PAINT KIT
 Rylard Slip Resistant additive can be used with all Rylard topcoats.
Thorough mixing must be ensured to obtain an even dispersion of the fine aggregate.
Care must be taken to ensure brush marks are not apparent.
All Rylard topcoats are suitable for sand-blinding, but care must be taken to ensure the sand is thoroughly dry.
SUMMARY

QUANTITY GUIDELINE

- To obtain the cabin length deduct the length of the bow and the stern from the overall length of the boat
- Deck area should be approximate to window area and has been allowed for in the above calculations
- On bare steel 2 coats of Rylard Zinc Phosphate Primer should be used at a similar coverage rate to the topcoat
- All figures are approximate and given for guidance only
 Rylard Paints is a well-respected name in the supply of paints for canal boats, narrow boats, dutch barges and leisure craft. Through its Research and Development program Rylard continues to provide state-of-the-art products, manufactured in the UK to the highest Quality standards. We provide a range of coatings for canal boats, from blacking to topsides, anti-slip for decks and roofs, to brass lacquer to keep metal fitments glowing.
01623 510 585
sales-huthwaite@axalta.com
http://rylardpaints.co.uk/

 with Harry & Felicity aboard")
 “In Rodley, the barges huddle, moored tight against the towpath alongside small wooden huts and deck chairs and sleeping pets.”

 I’d become used to writing non-fiction before I wrote ‘Cyclist’.
 The canal-side is a shared space that is open, equally, to everyone. It serves as an escape to the country for city dwellers and after these strange days of lock-down, I hope that people will return to it with a renewed love and appreciation for what it offers us.
 Through odd canal holidays, trips on the rivers and being fortunate enough to have friends on the canals as a child, I eventually caught up with our fantastic inland waterways and the lovely people that live, work and holiday on them. We found a fantastic company to hire from, Pennine Cruisers. A Skipton based company on that lovely Leeds and Liverpool canal. This company soon became the key to the start of Yorkshire Bespoke Tiller Pins. As the article goes on you will see why. All staff and owners, over many trips with them, soon became what me and my wife class as our Skipton family.
 On rummaging around, I found an old piece of round brass stock, along with a solid piece of aluminium from my workshop stock. Straight away I knew I was going to make him a tiller pin. The two pieces of material had caught my eye, even though they were both very dull. I thought that if I could use the two pieces together, the result would be quite unique. I began looking at new ways on how to work and join the two pieces together. I also knew when they were machined, they had to give a flawless impression as though they were all from one piece. I eventually found a way to do this and set about making the blank into an attractive eye-catching shape. This just seemed to flow and sooner rather than later, the tiller pin was made. I was unsure if I was on the right track with it all, so for a bit of confirmation I sent a picture of it to ‘Our Zoe’ at Pennine Cruisers to ask her opinion. I was expecting some changes may be needed, but all I got from Zoe was ‘Wayne is going to love that!’ It was buffed, polished and ready for our trip up to Skipton for our next of now many boat trips.
 By our next visit 6 weeks later, now October 2019, I had come up with 4 new designs all combining brass and aluminium. However, one of these was clearly turning heads: Tiller Pin Zoe (all my pins are named after the staff at Pennine Cruisers). Tiller pin Zoe was a little different, because I had incorporated a recess in the top to house an enamel Yorkshire rose.
 I started getting odd jobs - repairs, lathe work brazing and odd bits. Then people started sending me brass items that they wanted me to turn into tiller pins. Many were hollow and could not accommodate a good thread for the actual pin itself. So, I would machine a solid brass boss, then tig braze that to the hollow cast body. This was becoming a popular request, and other work started to flow in. Praise for my work was building and it was common for customers to say they were told that what I managed to do couldn’t be done. I suppose wrong advise from wrong person scenario.
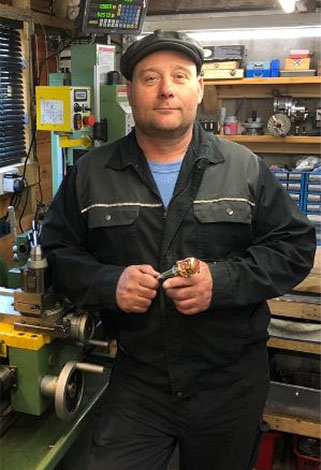 The rate and pace to me was exhausting. Sammie was relentless. Left no stone unturned. Within three days Yorkshire bespoke tiller pins had a running Facebook account. Had a web site not only built, but up and running. Had a PayPal account set up etc. Groups were getting in touch from our posts asking us to join. I had picked up my first big order thanks to Finesse boats who were very helpful and encouraging. This led to me finding a Sheffield based enamel logo and badge place. Which led to a local material suppliers Avus Metals. The snowball effect was starting to happen. New customers from the website and from Facebook were steadily on the up. Comments and positive feedback were a massive incentive for me to carry on. What really hit home was just how willing the much bigger companies, boat builders, marinas online canal merchants were to get behind the little firms. It really felt like big brothers were keeping a look out.
 It is very early days. I have a range of tiller pin bodies now and there will be more designs in the future. All named after Pennine Cruisers staff. There are now many other material options available and body material combinations. I am passionate about brass ware and love to repair figures that are broken – it gives them a second chance with a fantastic view from the tiller for their retirement. I find it very warming to know I have turned a personal object into a lovely tiller pin for someone. I now incorporate and work with more enamel options in my own tiller pin range along with boat name plates. I’m also venturing into other things for my growing customers, the cards are still on the table, but I believe they will be something to consider on your boat.
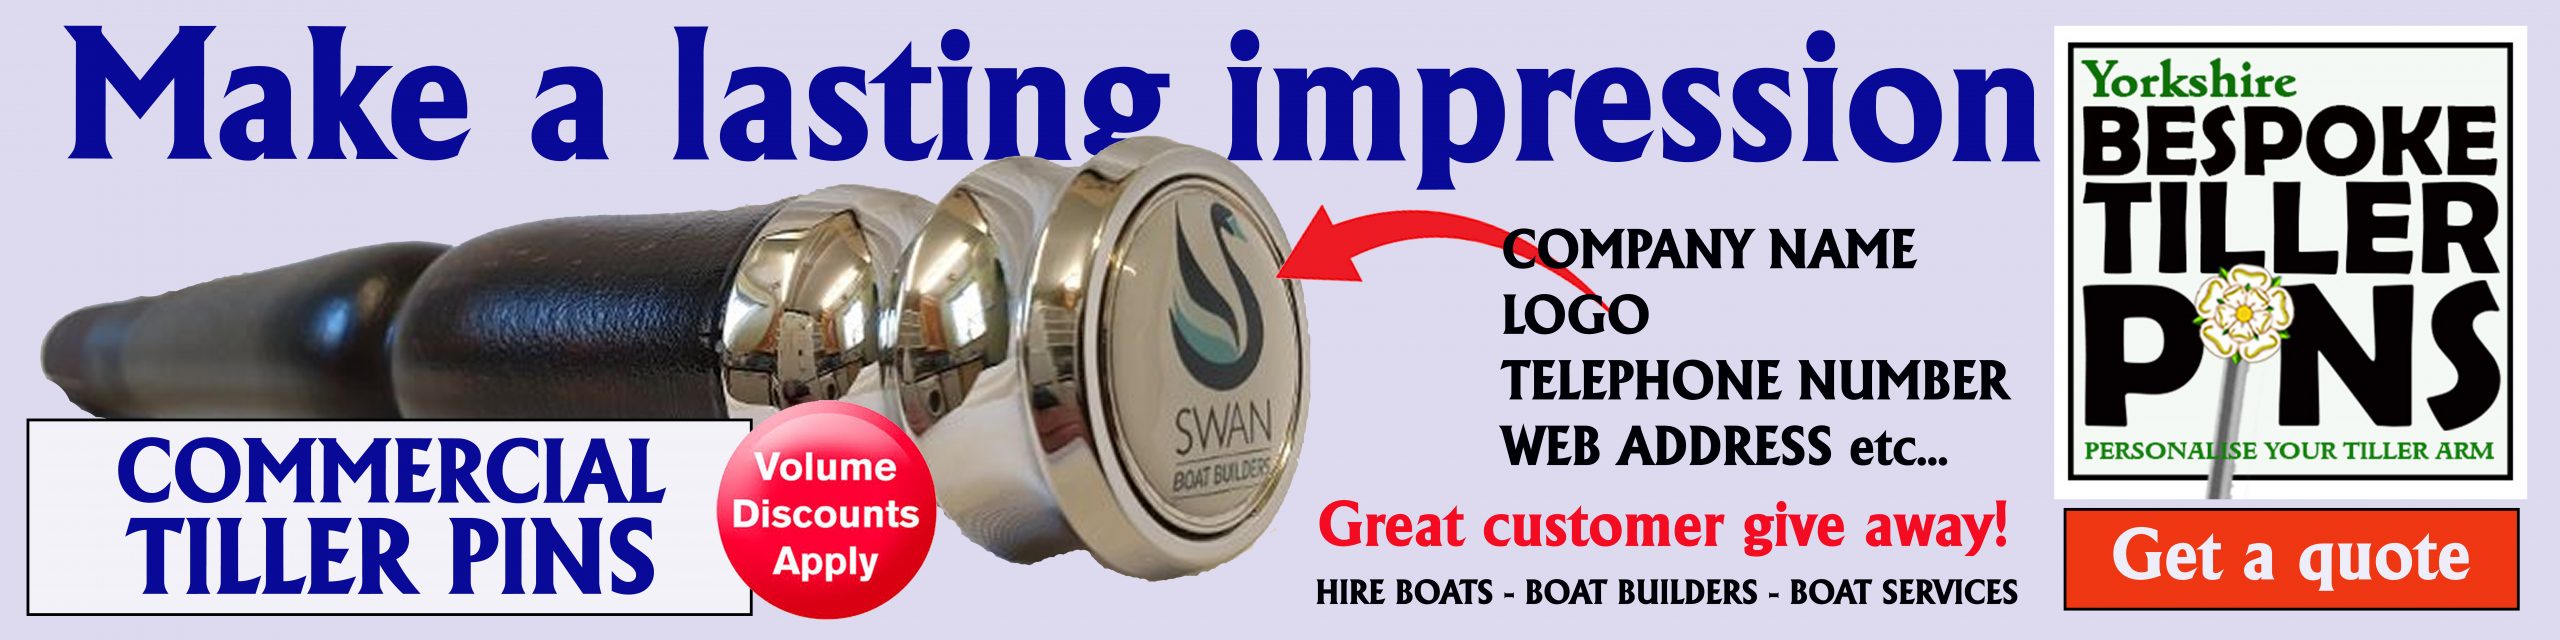


") Boatmen 100 years ago would have related to this very well. They were no strangers to competing against each other for the swankiest turn out as a distraction from the grinding pressure to get 'em ahead. Long before the advent of the show, christenings, weddings, even funerals would see the boat drawn by an a horse in full turn out, and May Day for one had been traditionally a day when “more brass than 'oss” would be presented to the world regardless of where you were. Indeed it could be profitable exercise even if there was no show to attend, as one man at Cannock Chase had a hobby of giving 10 bob to the horse he felt was the best turned out that day.
Boatmen 100 years ago would have related to this very well. They were no strangers to competing against each other for the swankiest turn out as a distraction from the grinding pressure to get 'em ahead. Long before the advent of the show, christenings, weddings, even funerals would see the boat drawn by an a horse in full turn out, and May Day for one had been traditionally a day when “more brass than 'oss” would be presented to the world regardless of where you were. Indeed it could be profitable exercise even if there was no show to attend, as one man at Cannock Chase had a hobby of giving 10 bob to the horse he felt was the best turned out that day. As with the heavy horse shows today, judging for turnouts involves a parade of the participants; but unlike today where they're confined to a show ring, the West Bromwich horses took a turn around the entire borough.
") It's affecting to look at the newspaper reports and see the names of horses long past; in 1927 for example, Fellows Morton & Clayton's “Duke” won 3rd prize in the Heavy Cart Mare or Gelding (radius 7 miles from Smethick boundry), while Cooper & Co took first place in Cleanest & Smartest Canal Boat Horse with “Snowball”, Leonard Leigh's horses “Prince” and “Toby” taking 2nd and 3rd respectively, Hingley & Son's “Blossom” taking 4th and Midlands and Coast's “Jack” taking 5th.
It's affecting to look at the newspaper reports and see the names of horses long past; in 1927 for example, Fellows Morton & Clayton's “Duke” won 3rd prize in the Heavy Cart Mare or Gelding (radius 7 miles from Smethick boundry), while Cooper & Co took first place in Cleanest & Smartest Canal Boat Horse with “Snowball”, Leonard Leigh's horses “Prince” and “Toby” taking 2nd and 3rd respectively, Hingley & Son's “Blossom” taking 4th and Midlands and Coast's “Jack” taking 5th. Disagreements with the judges happened then as now. Cooper & Co (who cleaned the table in the 1927 show) entered “Roger” in the 1925 Cleanest & Smartest Canal Boat Horse class, and after he'd successfully gained 2nd place from the judge, he had a fit, collapsed and had to shot. To add insult to injury, they then gave the second place to another horse on the grounds of breathing being a vital part of the turnout. This shouldn't have caused as much friction as it did at the time, Cooper's having already secured first place with a different horse anyway.


 So lets get started; the first thing I do is a symbol chart for everything that is going to be on the drawing, switches of the various types, the different types of lights etc. No complex electrical symbols that you do not know or understand just simple symbols. A Symbols list is to remind you what they are and what they do. Do not worry if you cannot think of everything you need or you miss some. They can easily be added to the Symbols list as you go on. But do it and do not rely on your memory. When you have to find faults the drawing becomes the map of what is there. Also when you come to sell the sell the boat the new owners will be impressed that there is a set of electrical drawings. It could get that sale, where it was only 50/50 in the buyers mind before. It shows that care has been taken of the boat from day one. How often do you hear boaters grumbling that all they have a jumble of cables and no drawings to tell them what should do what, please make sure you do Electrical Drawings for your boat, it is not difficult and will make installing them easier as well as fault finding is easier for whoever follows you.


") Staff who are placed onto the governments furlough scheme have to be furloughed for a minimum of three weeks and we always planned to use this time to take stock and risk assess our operation in order to get staff back to work as soon as safely possible, which is what we are now doing.
Staff who are placed onto the governments furlough scheme have to be furloughed for a minimum of three weeks and we always planned to use this time to take stock and risk assess our operation in order to get staff back to work as soon as safely possible, which is what we are now doing. ") We are extremely fortunate to have a fantastic team at the marina and all the staff have been very understanding during these times. The engineers are indeed pleased to be back at work and back to some form of normality during these uncertain times. As a leisure business we have qualified for a full rates relief, Cheshire East were very quick to implement our application. The furlough scheme was easy to apply for and paid out promptly, the bank was responsive to our request to put the loan repayments to interest only for three months.
We are extremely fortunate to have a fantastic team at the marina and all the staff have been very understanding during these times. The engineers are indeed pleased to be back at work and back to some form of normality during these uncertain times. As a leisure business we have qualified for a full rates relief, Cheshire East were very quick to implement our application. The furlough scheme was easy to apply for and paid out promptly, the bank was responsive to our request to put the loan repayments to interest only for three months. 
 1. Take extra care to access their craft safely and in accordance with government guidance on travel and social distancing