Tidal Areas:
Note that tide tables are only a theoretical guide.
It is possible that tide times and range can be dramatically affected by weather conditions. For example, a strong onshore wind can prevent river water exiting to sea, causing a build - up of water and no drop in level until the wind abates. Prolonged heavy rain or melting snow up river can cause an excess of river water which not only increases the speed of the current but can raise the water level.
In both cases, tide times will become irrelevant so boat owners should always keep a close eye on the flow of water and make their own judgement on when the tides peak.
As a general rule tides rise and fall very quickly midway between high and low water and much more slowly when they get near to the high water and low water times – there is in fact something called the 12ths Rule whereby the speed of rise and fall of the tide goes like this: 1 hour after High Water (HW) the tide drops 1/12th in the second hour after HW it drops 2/12ths, in the third hour it drops 3/12ths, in the fourth hour it drops a further 3/12ths in the fifth hour 2/12ths and in the sixth hour 1/12th when it reaches Low Water – exactly the same hourly process then applies to the tide whilst it rises again during the following six hours.
Where possible, moor and unmoor with the bow facing the flow of water. This allows much more control of the vessel during these manoeuvres.
In a tidal area, the flow of water will normally change direction every 6.25 hours ±.
The strongest flow (ebb tide) will always be down river to the sea. The weakest flow is the flood tide where water is being pushed up river against the natural down flow so this should always be taken into account.
If likely to depart your mooring during the ebb and your vessel is moored facing down stream, the last rope let go should be the forward backspring. This should be hand held on board, with the engine running astern sufficient to counter the ebb tide.
Push the stern into the flow of water using the backspring to prevent the boat creeping ahead until clear of the bank and any other vessels moored there.
Once clear, put the helm over sufficient to guide the vessel into mid - stream and let go the backspring as the engine is put ahead.
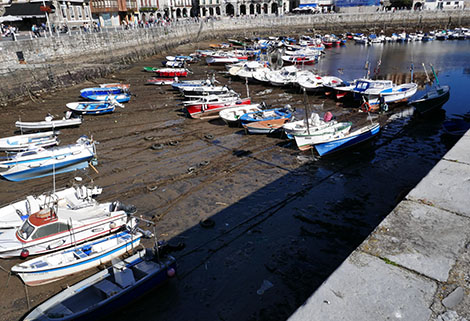
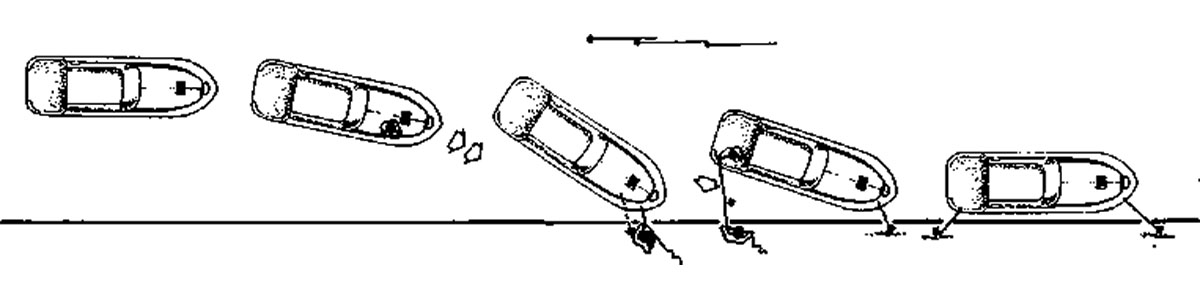
In areas of high rise and fall of the tide there is a risk of the deck getting caught under the quay heading causing the boat to tilt and, in extreme cases, turn over.
To avoid this, use your spare fenders (those fitted with lanyards) and rig them at a different level to the fitted fenders so that they can guide the boat clear of this hazard as the tide rises.
In areas of particularly large rise and fall, such as Great Yarmouth, it is recommended that the moorings and position of the boat in relation to the quay are checked every couple of hours.
Generally speaking, navigating a boat on inland waterways, both in the UK and in France, is a question of common sense, but you will undoubtedly encounter situations, strange signs etc., for which you may be unprepared.
In most cases reference to the navigational notes provided by your hire cruiser operator, or to the CEVNI guide if you have one, will soon make things clear.
In France especially you should pay particular attention to any signs bordered by a red square. These are either prohibitory (usually with a red diagonal line across telling you something you must not do), mandatory (telling you something you must do) or restrictive (telling you what restrictions apply)
Etiquette:
Be polite, for example by slowing down when passing moored boats, especially if the crew is eating a meal and try also not to upset anglers by creating a large wash or cutting their fishing lines.
Mooring:
On French inland waterways you can normally moor wherever you like along most canal towpaths unless a “no mooring” sign forbids it. However, you should take care not to obstruct the towpath by running your mooring ropes across it.
On waterways in the UK there are a lot more private parts of the riverbank where mooring without permission risks a confrontation with the landowner!
Before you can moor - up you need to come alongside the bank which is not as easy as it sounds, especially if there’ s a fresh breeze blowing or a strong current running.
Remember that leaping ashore can be hazardous, so make sure there isn’t a big drop from deck level to the quay.
Always try to wait until the bow of the vessel is resting alongside the bank before stepping ashore.
You should always approach the bank at very slow speed, as reverse gear is your only brake.
If there is a wind blowing, or a strong current running, you should approach facing into the wind or against the current, as these will help to slow you down. What happens if the wind and current are in opposite directions you ask?
Well the answer is that you have to guess which is likely to have the greatest effect on your boat, which isn’t always easy to tell – sometimes just a question of trial and error.
Motor towards the bank at a shallow angle and at low speed until you reach your intended mooring spot then turn your wheel sharply towards the bank and go gently into reverse gear.. This will have the effect of both stopping the boat and dragging the stern in towards the bank. Once you are safely alongside, put the gear into neutral but don’t switch off your engine until your mooring lines are secured in case the wash from another boat, or a gust of wind, means you need to manoeuvre a bit more.
In any event you should normally tie the bow first, with a crewman detailed to jump ashore with the bow - rope which he or she should secure before you throw them the stern rope.
The ropes should be taken and secured several metres forward of the boat at the bow end and several metres behind the boat at the stern.
The easiest way to moor on many canals is to take your mooring ropes around a tree or post on the bank then lead them back on board and secure them to one of your own mooring cleats. This makes casting - off when you leave much easier as it can probably all be done from on - board.
Unmooring:
Leaving a mooring on canals such as the Canal du Midi can be quite tricky, especially if there are tree - roots protruding into the water which could damage your propeller.
Normally the best way to leave a mooring is to untie the stern rope first then push the stern of the boat out from the bank whilst one of your crew stays on the bank holding the bow line, keeping the bow of the boat close enough to the bank for him or her to step aboard, with the rope at the appropriate moment at the same time pushing the bows out into the stream.
If you untie the bow line first you will almost certainly have a problem with the propeller hitting tree roots so, unless there are really unusual circumstances preventing you from doing so, you should normally release the stern first and the bow afterwards.

On canals and non-tidal rivers, unless the wind is blowing really hard, a bow-rope and a stern-rope is normally sufficient to secure a boat safely.
Remember not to pull the ropes too tight as this makes letting - go more difficult. For instance, any knots or windings onto the mooring cleats will be difficult to undo.
As previously mentioned, on tidal rivers, or if there’s a strong wind blowing, it may be necessary to use more than two mooring ropes to secure your boat safely.
The best way to do this is to have two extra ropes, known as “springs” with one of these secured to the bow of the boat and running aft (i.e.backwards) to a mooring point ashore somewhere astern of the boat and another rope from the stern of the boat leading forward to a mooring point ahead of the boat.
The best advice on mooring is to approach everything slowly and methodically.
Use the wind and current to help you rather than try to fight them!
Keep calm, don’t panic and you’ll soon get the hang of it.
Most hire boats are equipped with an anchor but this is essentially for emergency use and NOT for mooring!
The anchor is attached to a length of chain then to a rope which should be firmly secured to the boat (it’s worth checking this is all correct before you leave the base).
In the unlikely event of encountering an emergency situation as a result of engine failure, or through trying to manoeuvre too near a dam or weir, you should throw the anchor out over the bow and allow all the chain and some of the rope to run out before securing the remaining line to a cleat in the bows. This should hold you securely while you sort out the problem or call for assistance.
Should you have to anchor for any reason when you are at sea then you should ensure that there is at least three times as much anchor warp (chain & rope) as the water is deep – in other words if you anchor in ten feet of water then you will need to pay out at least thirty feet of anchor warp.
Locks:
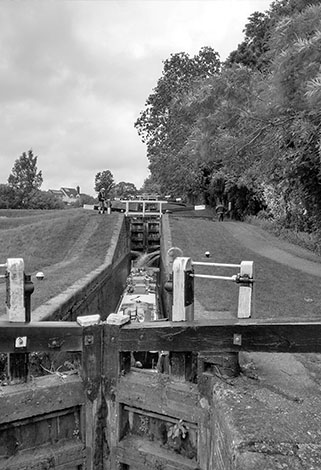
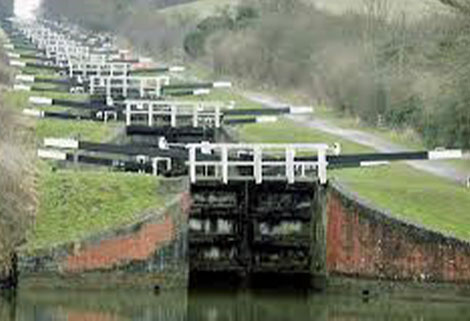 Locking should be a pleasant and interesting experience, but many newcomers are understandably somewhat daunted by what appears to be a complicated process. In fact it is all quite simple provided you follow a few basic rules.
Bear in mind that locks work to a timetable, that the lock - keeper has a job to do and is normally very experienced.
Always follow his advice or instructions and respect the fact that he’s required to give priority to commercial craft, so please be patient.
Quite often, especially at busy times, the lock keeper will want to group several boats together before operating the lock . Passage through locks is normally free of charge but , if a lock - keeper has been particularly helpful a tip will be appreciated and if he or his wife has produce for sale alongside the lock they’ll appreciate your patronage!
In some cases lock -keepers will telephone ahead to the next lock to alert them to expect your arrival so if you plan to moor up for some time between this lock and the next one please tell the lock keeper.
When approaching a lock you should reduce speed when you’re about 150 metres from it and announce your arrival with a blast of your horn. If the lock gates are open when you arrive you can normally go straight in and tie up.
If there is a boat in the lock and/or if the gates are closed you should moor up and wait about 100 metres short of the entrance, making sure that you don’t impede the passage of other vessels.
Always remember to manoeuvre slowly, be careful climbing ladders which are often slippery, never to jump off the lock onto your cabin roof and to coil your ropes away tidily once you’ve cleared the lock.
Locking Up - Stream: (i.e. an ascending lock).

Approach the lower level (downstream) gate very slowly and drop -off one or two of your crew either onto the bank or via the ladder normally situated just inside the lock.
It may be possible for these crew members to take your mooring lines ashore with them but , if not , once fully inside the lock you need to throw your mooring lines up to them. To do this make a coil of the rope and throw it in a similar manner to bowling a cricket ball.
The crew ashore should loop the ropes around the mooring bollards provided, without tying them , and throw the end of the ropes back to the crew member(s) on board.
Once your boat is secured alongside, the lock keeper will close the downstream gates behind you . Some locks are operated manually, in which case the lock keeper may appreciate so me help from your crew members ashore.
Once the downstream gates are closed, the lock - keeper will open the up - stream sluices to fill the lock .
Make sure you keep your boat snugly alongside the lock wall while the lock fills, which means that the crew on board must constantly tighten the ropes to reduce the slack in the mooring lines as the boat rises.
When the water level in the lock is equal to that in the canal ahead the gates are opened, you can untie your mooring ropes, coil them neatly, pick up your crew and move slowly ahead.
It’s really all quite simple!
Locking Down - Stream: (i.e. a descending lock)
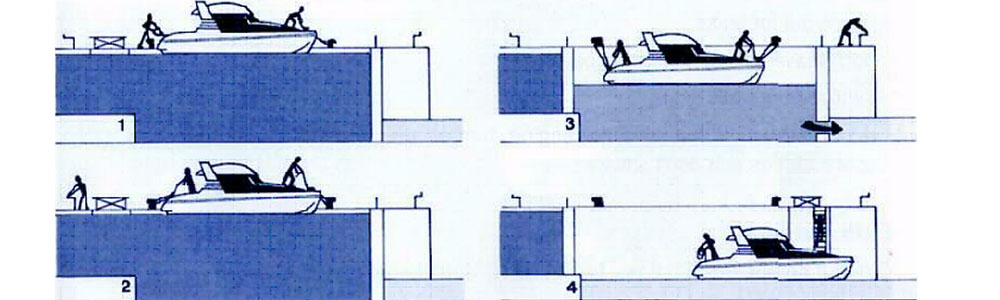
Providing the up - stream lock gate (called the crown gate) is open you should enter the lock slowly and carefully and drop one or two crew members off onto the bank taking ropes with them.
These ropes should be looped around the bollards provided on the lock - side, without tying them , before throwing them back on board leaving plenty of slack. (at least 3 - 4 metres)
The lock keeper will now close the crown gate and open the sluices ahead of you to allow the water in the lock to fall while you and you crew adjust the slack in the mooring ropes.
Once the level of water in the lock and that in the canal ahead are equal the gates ahead of you will be opened, and you can coil your mooring ropes, pick up your crew - members and proceed on your way.
Emergencies: Hopefully there won’t be any!
Boating ought to be fun, but you’ll enjoy it more if you try to do things the correct way and to look “seamanlike” by keeping calm and running a “tidy ship” Always try to keep ropes coiled and not leave things lying about, particularly on deck, where members of the crew can trip over them.
Observe sensible precautions, particularly where gas and re-fuelling are concerned.
Don’t smoke whilst changing gas bottles or when re-fuelling!
Be careful when going forward along the decks. Watch out for low bridges especially if you’re on the cabin roof for some reason. If someone is unfortunate enough to fall in don’t panic
You should always know where to find your emergency contact details.
Your first call may well be to your hire company but these are often closed on Sundays and out of office hours so you should know in advance where to call in the event of an emergency .
An emergency involving injury to anyone would warrant a 999 call in the UK or a “Mayday” call on VHF Channel 16 if you’re at sea.
Man Overboard!
A man - overboard situation at sea is always dangerous and most marine Global Positioning Systems (GPS) have a “ man overboard ” button which, if pressed immediately when someone falls overboard, logs the exact location.
It is not quite so dangerous if someone falls into a canal, although falling into a tidal river is potentially just as hazardous as falling in the sea.
There are tried and tested procedures for recovering someone who has fallen overboard at sea and some of those procedures could apply equally well on the river or on a canal, so it is worth running very briefly through them.
Firstly don’t lose sight of the person in the water, which can easily happen at sea when there are even moderately large waves, but it could also happen on a river in misty conditions.
The standard advice is to tell a crew member to keep watching the person in the water while the skipper manoeuvres the boat.
Secondly, and just as importantly, remember that anyone in the water is very vulnerable to being severely cut by your propeller, so whatever you do keep the stern of the boat well clear of them.
It is usually best to approach the person in the water SLOWLY in an up - wind direction so that the boat can more easily be stopped , and the engine put into neutral (to stop the propeller from turning) when you are alongside them.
If you have enough crew aboard then you should consider anchoring and switching your engine off once you are close enough to the casualty to use paddles or a bow thruster to get alongside the person in the water.
Remember too that it is not easy for anyone in the water, who will be wet and probably cold, to clamber up the side of a boat, so a rope over the side with a loop in it, into which they can place a foot, will certainly help.
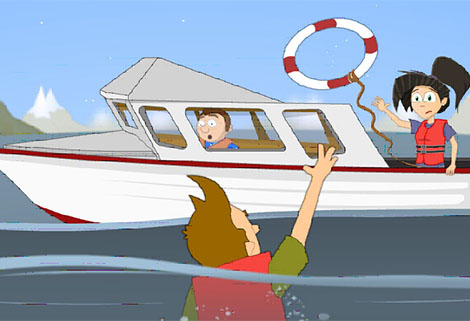
Hopefully your boating experiences will all be uneventful in terms of emergencies but it’s well worthwhile actually practising recovering something such as a large buoy or lifebelt from the water – it’s not as easy as you might think!
All that remains is for us to wish you “Bonnes Voyages”
Clive Edwards and Captain Chris Woods
 A quick lick of paint just to touch up the areas the weather had got to and some natty grip tape for the deck from an online store – which now is the new norm - and we are ready for the off and a cruise down to Semmington for the first time in ages.

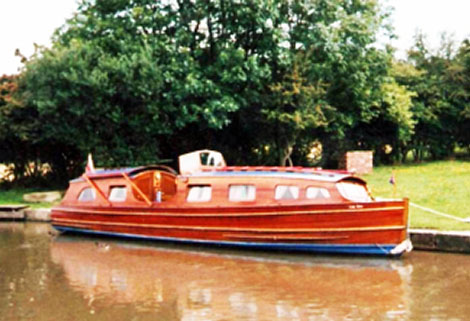
 I was built sometime in the reign of Victoria, at least 135 years ago, in the Black Country, Birmingham.
 I had a small cabin then, where the men, usually 3, could have a brew (and occasionally doss down), and in the middle of my hold was a small hand crane, attached to the great iron scoop and its long wooden handle.
 Each scoopful was about a hundredweight of mud and water, and it went everywhere. My decks were slick with mud, and it reeked in high summer! They had to regularly pump the water out so they could get a full load, which was about 25 tonnes at a time.
 Dredgers sometimes lifted things that were best left lying: guns, knives, sometimes stolen safes and strongboxes (empty of course). Occasionally a dredger would bring a body up, which was never fun for anyone involved and would invariably hold up traffic. It wasn’t unheard of for a body to be quietly slipped back into the water without telling anyone official.
 I did that until 1937, when they took away my dredging gear and I was put onto general maintenance. During the war I did whatever was needed; sometimes I carried things like lock gates, sometimes I carried bits of Birmingham away that had been blown up by Mr Hitler. Sometimes I even carried cargo for the war effort.
 And then, after all that service, more than 100 years dedicated to keeping the canals going, waterways decided they didn’t want me anymore, and that I was “beyond economical repair.”
 I am now a cargo boat in my own right. I am still unpowered, but I have a motorboat of my own to take me where I wish, and I have my little cabin back. I will be carrying coal and logs for a fuel boat, and maybe tanks of diesel in the summer. I’ll be taking animal feed, and occasionally animals, the pets of my keeper.
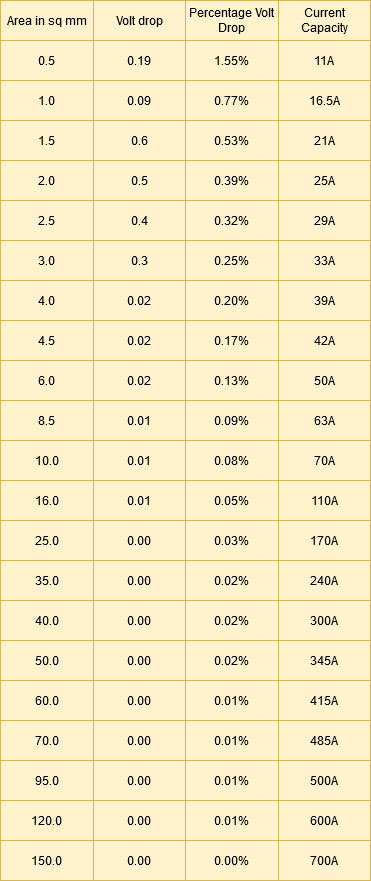
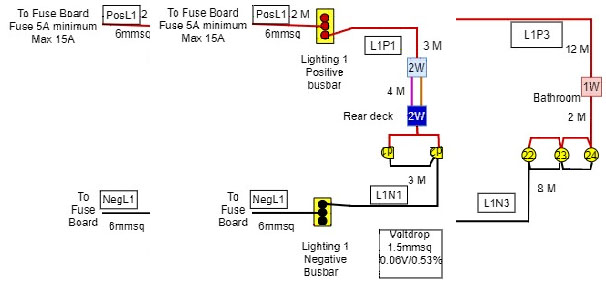
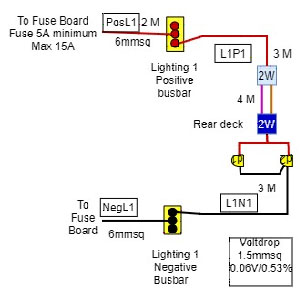 The first thing is that for running electrical cables for anything around the boat we should use nothing smaller that 1.5mmsq. This is because this is the minimum size that will stand up to the stresses of being strung around a boat that vibrates.
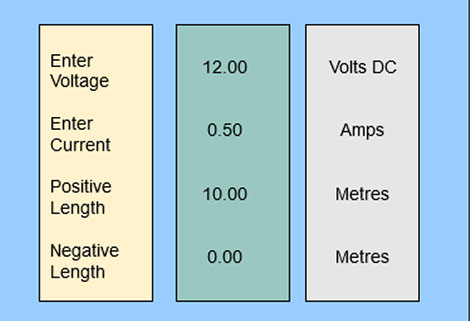


 My friend, Janet, and I, both in our twenties, decided we would enjoy a week’s holiday on a narrowboat. It was not a working holiday, so we were not expected to help at the locks. We were to board at Market Harborough on the Grand Union canal.
 There were two elderly ladies also on board and they offered to teach us how to play Canasta, the only time I have ever played that card game. We enjoyed most evenings playing cards but the candle flames attracted the moths and we spent a lot of time waving our arms about to keep them away.
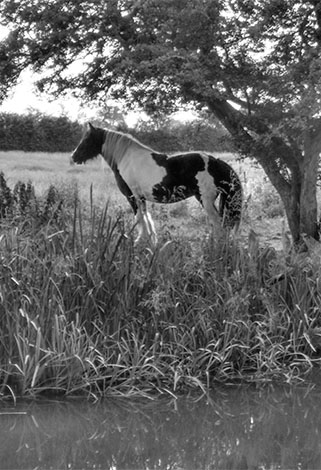 Other memories are the peace when gliding slowly along the canals and seeing a part of the countryside that the motorist never sees. On one occasion, we found a sheep that had fallen down the bank and was standing on a ledge at the side of the canal. Its wool was sodden and it was too heavy to clamber out again. We were able to alert someone further along the bank.
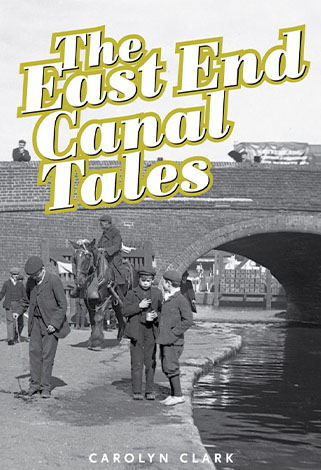 The East End Canal Tales weaves the memories of over 50 local residents together with historical accounts to tell of intriguing, humorous, moving and often surprising stories of life and work on the Regent’s and Hertford Union Canals over two centuries.
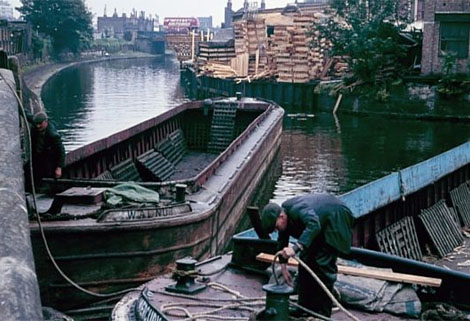 Read about canal trades of coal and manure and canal-side industries ranging from timber and metalworks to ice and chocolate. Learn about the canal’s role in what was the equivalent of the Victorian internet. Relive childhood memories of diving from ‘the pipe’ and being chased by the ‘cut runners’. Join the villains’ search for the holy grail of a gold cargo. Find out what happened in the old buildings which you can still find along the canal banks and what it was like to work on the Cut.
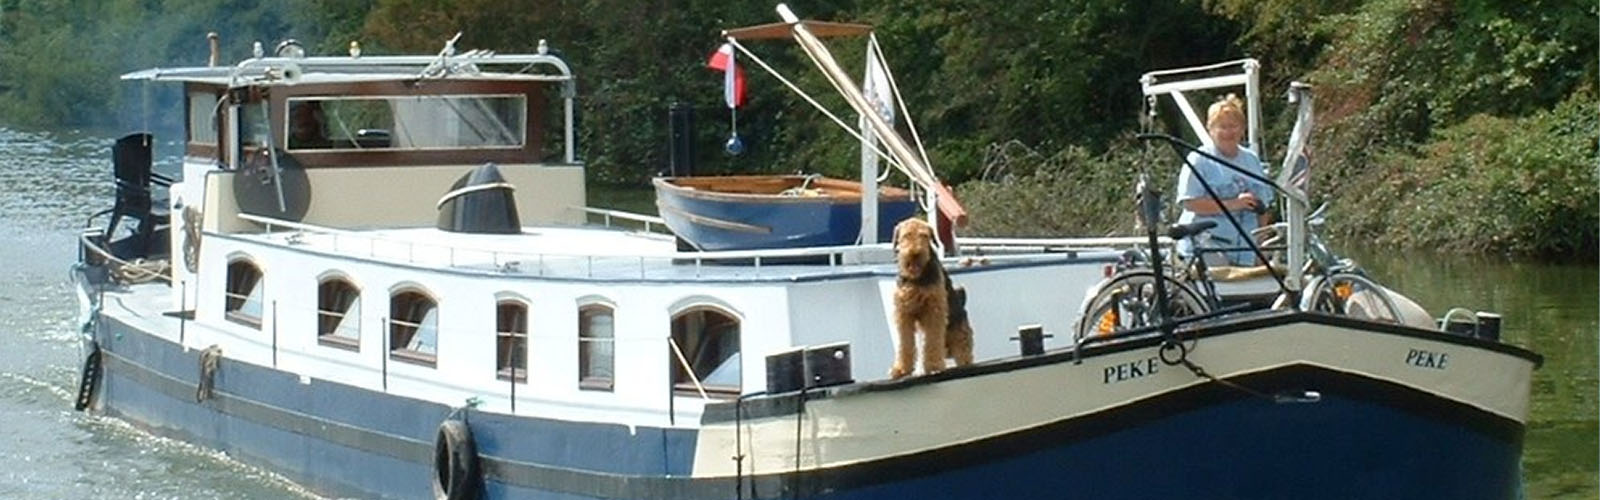


 This publication has been produced by the Merchant Navy Association Boat Club with the aim of providing basic information for anyone venturing onto the water for the first time. The idea is to help make the experience more enjoyable and safer, both for you the reader and for other users of the waterways.