how to wire a narrowboat - part 1
wiring my boat’s domestic DC – where do I start?
where are things going to go? - the drawings
The start is not what batteries you are going to have; it would be lovely if it were. That would make it too easy and this is a boat and boats are rarely easy.
The starting point is with the electrical items and where they are going to go. How we connect them to the batteries that are going to supply the power needed.
Begin with a scale outline drawing of the boat. Mark in where the cabin walls are going to go, doorways and what the rooms are. Then mark the drawing in 1 metre sections stern to bow. If you have a side view also mark that in 1-metre sections vertically from the base plate up.

Now breathe and make several copies of the master diagram. It is now is the time to involve the other half.
Starting with the lighting, mark the positions of the lights on the diagram, giving them a number etc. Don’t worry about cable routes etc just mark the lights position. Where their the switches are going. Mark the switches in someway. Do not forget about wall lights. Lights over the cooker and kitchen sink, Bathroom sink lights etc in the bathroom.
Also mark on the drawing where you would like 12vDC table lamps and standards lamps. Again mark and number. Join up each light that will be operated by the same switch/switches and link to the switch/switches and you end up with a diagram like this.

Using another boat outline, mark where the water pump is going and its local switch so it can be turned off when the tank is empty. Same with the shower pump and it maybe a good thought to think about the shower pump being an automatic pump so only one hole is needed through the hull. But this may not be possible if the kitchen is on the other side of the boat. Don’t forget about the Bilge pump it needs to draw its power from the Domestic bank not the Starter battery. Remember to give them an identity.
Now the bit I find the most difficult, where to put the 12V power points. Think about where you want 12V power points for charging etc. Mark them on the drawing then add where you want USB charging points and mark them. Then go back and look, have you put one in the kitchen area? If not I would suggest add a 12V power point and a USB. Think about someone cooking from a recipe online.
Bedrooms, I suggest that you make sure both sides of the bed have access to a USB charger for the mobile phone, and Kindle. Do not forget the navigation lights. I know they are not a requirement on the UK canals but rivers etc require them. Regardless of that a red & green light come towards you at night gives you the beam of the boat and its outer edges. It making it a bit easier to pass in the dark.
Below my version of the outline with the sockets etc marked and numbered if more than one.

Now is the time to think about how you are going to get the cabling from the stern of the boat to the bows and everything that needs power. Do not just think about the 12V DC cabling but also the AC mains cabling. There are various ways to do this, some people make a duct under each of the gunnels to take the cables. Others put a duct down each side of the boat in the ceiling. Along the edge where the ceiling meets the sidewall. You will also need a route from Port to the Starboard side of the boat. You also need to think how you are going to get cabling up and down the boat vertically. For switches this can be done inside some conduit behind the panelling. Once you have decided how and where it is going to go, mark it on the outlines.
The next stage is building the circuits, adding the cabling. But first you have to decide where the electrics cupboard is going. In it or adjacent will go the 12VDC Fuse board (Distribution Board) any inverter, charger etc. So don’t skimp on its size 🙂 Mark the fuse board on all the outlines.
Now the next thing to do is to draw the electrical diagram. Lets start with the lights, first split the lights up roughly into two halves or even three or four if there are a lot of lights or long cable runs; so that each fuse has lights from every area of the boat. The each section will run from its own fuse, i.e. Lights 1 fuse and Lights 2 fuse. Doing it this way means that if one of the lighting fuses blows there is still lighting available close to hand and one does not have to stumble around the boat looking for a torch before the lights are back on. Then you can sort out what caused the problem and sort it out.
To draw the electrical diagrams it is easier to use one of the free drawing apps. I use draw.io, all the drawings in this article, as well as the ones I put on the group are drawn on draw.io. It allows for a clear simple drawing that can be altered and bits moved around with no problems.
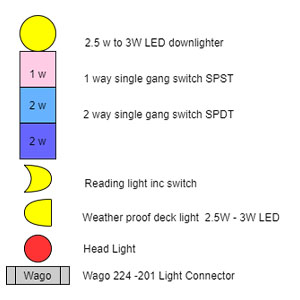
 So lets get started; the first thing I do is a symbol chart for everything that is going to be on the drawing, switches of the various types, the different types of lights etc. No complex electrical symbols that you do not know or understand just simple symbols. A Symbols list is to remind you what they are and what they do. Do not worry if you cannot think of everything you need or you miss some. They can easily be added to the Symbols list as you go on. But do it and do not rely on your memory. When you have to find faults the drawing becomes the map of what is there. Also when you come to sell the sell the boat the new owners will be impressed that there is a set of electrical drawings. It could get that sale, where it was only 50/50 in the buyers mind before. It shows that care has been taken of the boat from day one. How often do you hear boaters grumbling that all they have a jumble of cables and no drawings to tell them what should do what, please make sure you do Electrical Drawings for your boat, it is not difficult and will make installing them easier as well as fault finding is easier for whoever follows you.
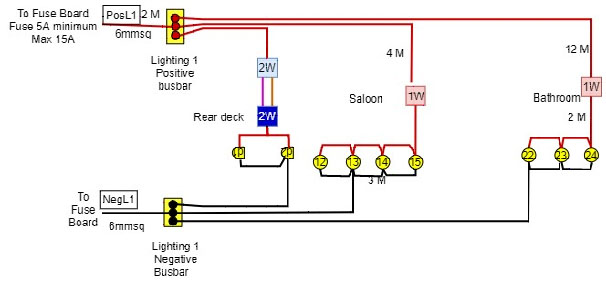
So lets start with Lighting one. I normally start at the stern and work my way forward doing a separate section of the drawing for each fuse. I split the lighting into two or three sections so that the volt-drop is at a reasonable level and never less than two sections. Then if one lighting fuse blows there is light in every part of the boat albeit reduced. This is going to need to be three sections to keep the volt-drop to reasonable limits.

Start with the two rear deck lights. The most complicated electrical circuits that you will encounter in the whole of your wiring of your boat. There is the need to be able to switch them on and off from two different positions. If it is confusing I have written an explanation of how it works in the Appendix of the article.
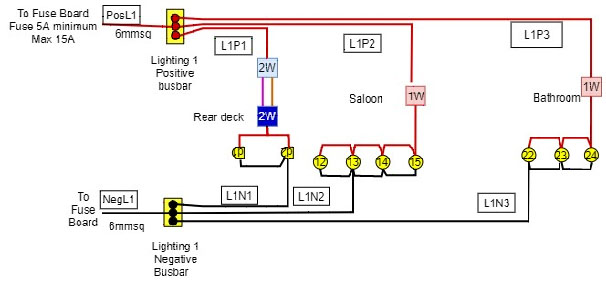
Label each of the cables, as an example, the positive cable from the Lighting 1 Positive busbar to the common of the first of the two-way switches. I have called it L1P1 as it is for the first lighting section on the drawing.

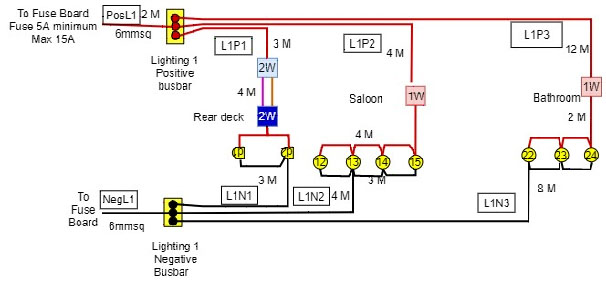
Having drawn the first of the lighting diagrams you need to work out how long those cables are. Remember if the boat is a Narrow Boat, it will have an internal beam of 2 metres approximately. Your drawing will have marker lines spaced at 1 metre apart. Using these to measure the L1P1 cable from the switch the through the cable ducts back to fuse board, which is where the Busbars will go measuring the distance, mark the distance on the cable on the drawing. Do not forget the ups and downs the cable has to travel. Now continue to measure and mark the length of every cable on the drawing. Label the cables from the lights to the Busbars both negative and positive and you will end up with a drawing that looks like this.

©Graham Mills, 2020

